Recycled Milk or Juice Carton Birdfeeder
A fun recycling craft for kids.
Supplies you will need:
- a gable-topped (half gallon size) carton with lid
- flat-based buttons, bottle caps, pieces of recycled materials for decorations
- a small piece of sandpaper
- a straight twig (about 3-4 inches longer than the width of the carton). You could also use an old pencil.
- a small container for the paint
- a small container of birdseed to get you started
- a piece of twine for hanging
Materials and tools needed:
- Paint (acrylic is easiest to clean up. It is best to put on two coats).
- Paintbrush (a small foam brush will work)
- Wallpaper or other type of cutter, scissors, and something to punch hole in the carton
- Hot glue gun or good PVA glue
- Ink markers
Steps:
- Thoroughly rinse out the inside of the carton. Dry. Lightly sand off the wax on the outside so paint will stick.
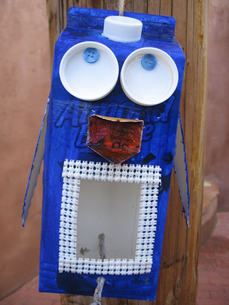
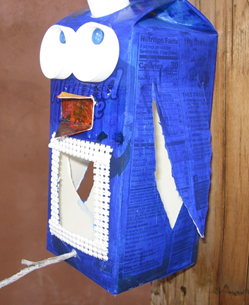
- Put the lid on the carton. Using your cutter and scissors and being careful, cut out a “tummy” in the bottom half of the front of the bird (about 2 ½” high and 2” wide). Be sure to leave room below the cutout for the perch (about an inch). Also, cut out a long wing in each side of the carton. For the wings, leave the top attached so they are like flaps with a pointed bottom end. See photo. You can save the cutout of the “tummy” to make a beak shape.
- Paint the outside with two coats of acrylic paint. (If you have decoupage medium you could brush it over the carton when the paint is dry, to truly make it waterproof).
- Make eyes by gluing the smaller cap to inside of larger cap and then gluing the button onto the inside of the smaller cap. Glue the eyes onto the front of the carton above the “tummy”. Cut out a beak from carton material or from cardboard like a tablet back. You can make a simple triangle. Or you can cut out a shape that is two small triangles on opposite sides of a rectangle (see sketch). Bend the triangles in toward the center to form the top and bottom of the beak. Color with paint or ink markers. Glue the rectangle to the carton at a spot below the eyes, with a triangle at the top and bottom.

5. Finish decorating: you can outline the “tummy” hole with scraps of discarded shelf liner and you might want to paste pics of birds or flowers onto the carton. Give your birdfeeder some character!
6. To make a perch, punch a little hole in the front and back of feeder below the “tummy” hole, making them level. Don’t make the hole bigger than your twig—it should be snug. Slide the twig or pencil through both holes.
7. Punch a hole in the top strip of the carton. This can be a little hard to do so children might need some help. Thread strong string for hanging. Add birdseed and hang on a tree limb. Enjoy your bird watching!
Thanks for reusing discarded materials and for helping our feathered friends!
Send a photo of your birdfeeder to tlassiter3@gmail.com and we will post them on our FB page at https://www.facebook.com/recyclegallup/