Tetra Pak Wallet
Get children excited about recycling with this fun craft project.
A Tetra Pak is a strong, lightweight type of food packaging that is hard to recycle but easy to reuse to make a simple wallet.
What you need:
Supplies
- One 32 oz (1 quart) rectangular Tetra Pak carton (such as a nut milk container)
- Duct tape or masking/decorative tape about ¾” wide
- One rubber band about 3” long and ¼” wide (strong enough to hold wallet closed)
- Decorating materials: papers, clippings from magazines, stickers, (also your own art work)
Tools
- Scissors/cutter
- Hole punch or awl
- Ink marker or pen, and ruler
- Glue or tape (clear packing tape or decoupage medium like Mod Podge optional)
- Two medium-sized binder clips (optional)
- Stapler (optional)
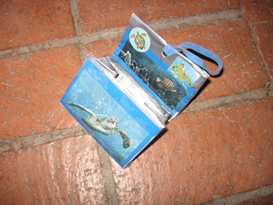
You will be making a wallet with two pockets covered by a flap. The wallet is about 3 ½” (9cm) wide and 2 ¾” (7 cm) high when the flap is folded over. The inside of the Tetra Pak, which is silver- colored, will be the inside of your wallet. It will be big enough to hold credit cards. See this YouTube video for extra help: https://www.youtube.com/watch?v=UZGOARQliIM
Steps:
- Take off the plastic cap, pull up the triangular corners at the top and bottom of the Tetra Pak.
- Cut off the bottom and top of the Pak with the cutter, or flatten the carton slightly and cut with scissors. You now have a rectangular “tube” with openings at each end.
- Make sure the inside is clean and dry.
- Measure the height of the Pak and divide it into thirds. Mark off the thirds with two horizontal lines on the back of the Pak, using your ink marker. (The Pak height should be about 7 ¾”” or 19.5cm and each third should be about 2 ½”to 2 ¾” or 6.5cm in height).
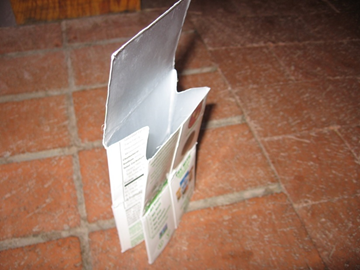
- Make the wallet’s flap from the top third of the Pak. Cut off the two narrow sides and the back side from the top third, leaving the wide front side for the fold-over flap. Put your ruler across the base of the flat and fold it down.
- Lay the Pak on a table and gently push on the front of the Pak so that the narrow sides accordion in toward the inside of the Pak. The Pak should now look like this:
7. Fold up the bottom one third of the Pak using your ruler to make a crease along the marked line. This gives your wallet two pockets with gussets or accordion folds on the sides.
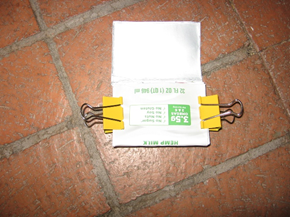
8. You might need to trim a little off of the top edge of the back pocket. (Optional—while you get ready to tape the edges of the wallet, you can pinch the wallet together at the edge of each side of the pockets with the binder clips. This will help squeeze the wallet flat, as in the photo).
9. Cover the cut edges of both pockets with tape. Measure the length needed and cut tape to this length and then carefully center a strip of tape on the edge and press firmly on each side—inside and out.
10. Fold up the bottom so your two pockets are together. Tape together the two pockets by taping where the edges of the pockets meet. (You could also staple these together and then cover with tape).
11. Measure and cut pieces of tape so that you can cover the three edges of the wallet’s flap as you covered the edges of the pockets. Now all the cut edges of the Pak are reinforced.
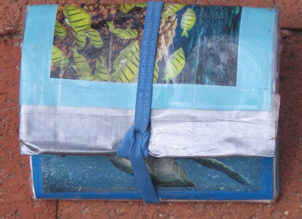
12. Time to personalize your wallet with decorations! Cover it with artwork that you make or cut from magazines. Embellish with stickers. If you want to cover all the writing on the outside of the Pak but your picture is not big enough, you can glue the picture onto a piece of colored paper cut to the size you need. You can cover the flap and the back with one picture, but first see how it looks with the flap closed. You don’t want your pic to be upside down with the flap closed. Cover the inside of the flap too. Glue your decorations onto the wallet, or tape on with clear tape. The clear tape will make your wallet more durable. An alternative to tape is to brush Mod Podge over your pics.

13. Punch a hole in the center of the bottom of the flap, not too close to the edge.
14. Put the rubber band through the hole to make a fastener. Squeeze the rubber band loop and push one end of the loop through the hole. Pull the other end of the rubber band through the loop already through the hole, to form a knot. Close the flap and wrap the rubber band around the wallet to close it.
Hey Kids – Keep Reusing and Recycling!
McKinley Citizens’ Recycling Council
www.recyclegallup.org
505-722-5142